Summary: in this tutorial, you will learn how to create a new table in the MySQL database using the CREATE TABLE statement.
MySQL CREATE TABLE Introduction
A table in any relational database is a basic element that holds data in the form of rows and columns. So, we must have a very clear idea about creating a table in any relational database.
The CREATE TABLE statement is used to create a new table in the MySQL database.
MySQL CREATE TABLE Syntax
The following illustration shows the generic syntax for creating a table in the MySQL database.
CREATE TABLE [IF NOT EXIST] table_name (
column_definition_1,
column_definition_2,
....
column_definition_n,
table_constraints
) ENGINE = storage_engine;
Let’s understand each term’s in great detail.
First, you specify the name of the table after the CREATE TABLE keywords. The name of the table should be unique within the database. If the table name you specify already exists in the database, MySQL throws an error. Optionally, you can use IF NOT EXIST after the CREATE TABLE keywords, the MySQL will not throw any error in case of a duplicate table. Simply, it will not create the table.
Second, you specify the list of columns required for the table along with the column’s data types and column’s constraints. Each column is separated by commas.
Below is the generic syntax of a column definition:
column_name data_type(length) [NOT NULL] [DEFAULT value] [AUTO INCREEMENT] [column constraints]
In this syntax,
i) The column_name denotes the name of the column. Each column has a data type and optional size e.g. varchar(50), DATE, etc.
ii) After the column name and data type, you optionally specify the NOT NULL constraint which ensures that the column will not contain any null value. Besides NOT NULL, you can specify constraints such as UNIQUE, CHECK, etc.
iii) The optional parameter DEFAULT specifies the default value for the column that means if a value is not provided for the column during data insertion, the default value will be inserted.
iv) The AUTO_INCREMENT specifies that the value of the column is automatically incremented by one whenever a new row is inserted into the table. In MySQL, the initial value for the AUTO_INCREMENT is 1 and each table can have a maximum of one AUTO_INCREMENT column.
Third, after the column lists, you can specify the table constraints such as PRIMARY KEY, FOREIGN KEY, UNIQUE, and CHECK.
For example, if you want to declare the primary key on the combination of two or more columns, you can use the following syntax.
PRIMARY KEY ( column_1, column_2,...)
Fourth, optionally. you can specify the storage engine for the table in the ENGINE clause. You can specify any supported engine such as InnoDB, MyISAM, etc. The default is the InnoDB storage engine.
MySQL CREATE TABLE Example
MySQL provides two different ways to create a new table into the database.
- MySQL Command Line Client
- MySQL Workbench
1) Creating Table using MySQL Command Line Client
First, launch the MySQL Command Line Client tool and log in with a user who has the CREATE TABLE privileges on the database where you want to create the table. Here, we are using the root user.
mysql -u root -p
It will ask for the root password which you have kept during the MySQL installation. Type the root user password and press the enter key.
Second, select the database where you want to create the table as follows.
List the available databases as below:
mysql> show databases;
+--------------------+
| Database           |
+--------------------+
| companydb          |
| information_schema |
| mysql              |
| performance_schema |
| sys                |
| university         |
| world              |
+--------------------+
7 rows in set (0.00 sec)
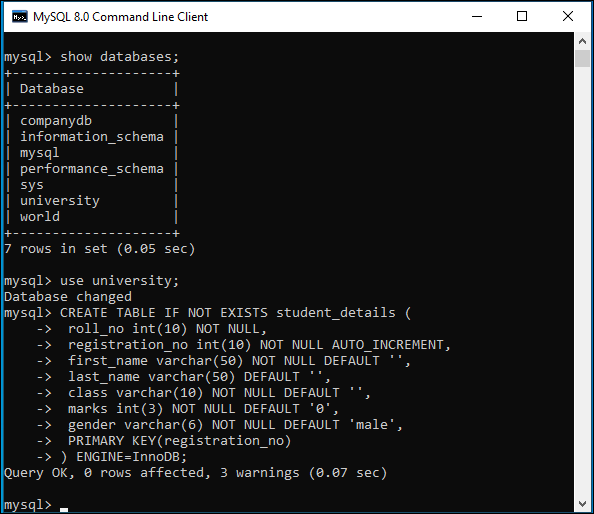
Now, select the university database as shown below.
mysql> use university;
Database changed
Finally, run the CREATE TABLE statement to create a new table into the selected database.
In the below example, we are creating a student_details table in the university database.
CREATE TABLE IF NOT EXISTS student_details (
 roll_no int(10) NOT NULL,
 registration_no int(10) NOT NULL AUTO_INCREMENT,
 first_name varchar(50) NOT NULL DEFAULT '',
 last_name varchar(50) DEFAULT '',
 class varchar(10) NOT NULL DEFAULT '',
 marks int(3) NOT NULL DEFAULT '0',
 gender varchar(6) NOT NULL DEFAULT 'male',
 PRIMARY KEY(registration_no)
) ENGINE=InnoDB;
Visual representation of MySQL CREATE TABLE:
To confirm if the table is created, you can use the following command.
show tables;
This will give output as below:
mysql> show tables;
+----------------------+
| Tables_in_university |
+----------------------+
| student_details      |
+----------------------+
1 row in set (0.00 sec)
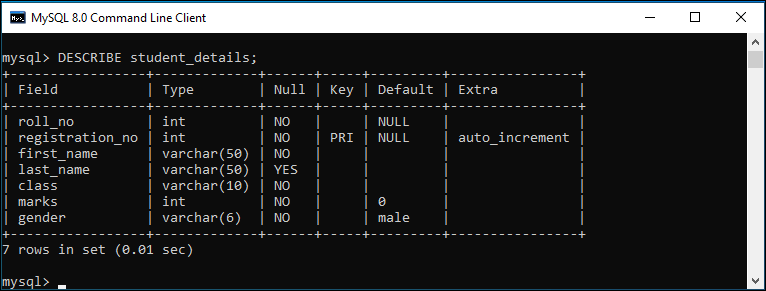
In order to table structure, you need to use the following command.
mysql> DESCRIBE student_details;
The output is as below.
2) Creating Table using MySQL Workbench
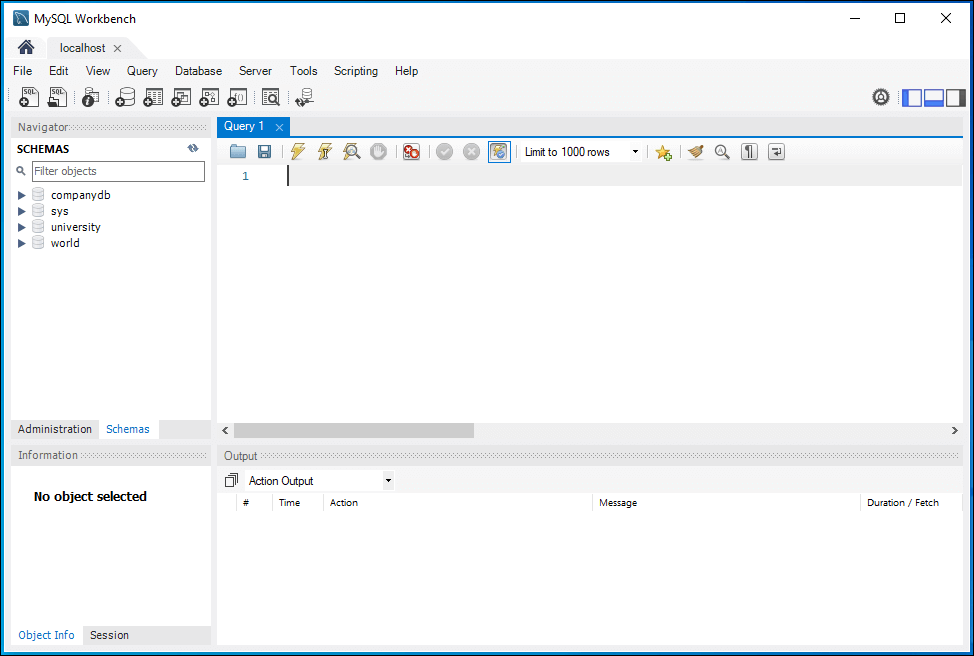
MySQL Workbench is a GUI tool which is can be used to create tables, views, indexes quickly and efficiently. To create a new table in MySQL, you need to launch the MySQL Workbench and log in using the username and password. You can follow our tutorial on how to connect MySQL using MySQL Workbench.
Once connected, you will see the screen something like this.
Now you need to follow the below steps for table creation.
First, navigate to the Navigation window and click on the Schema tab. Here, you can see the databases that are created previously. You need to decide on which database you are going to create the table.
Second, once decided, select and double click on the database. The database will expand now and you can see sub-menus which are Tables, Views, Stored Procedures, and Functions.
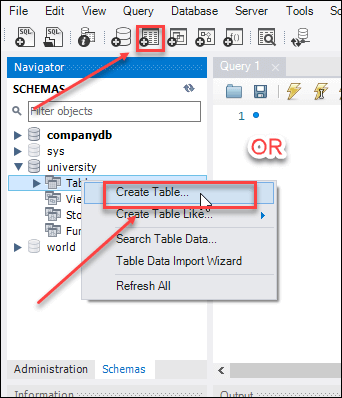
Third, right-click on the Tables sub-menu and select the Create Table… option. You can also click on the create a new table icon to create a table.
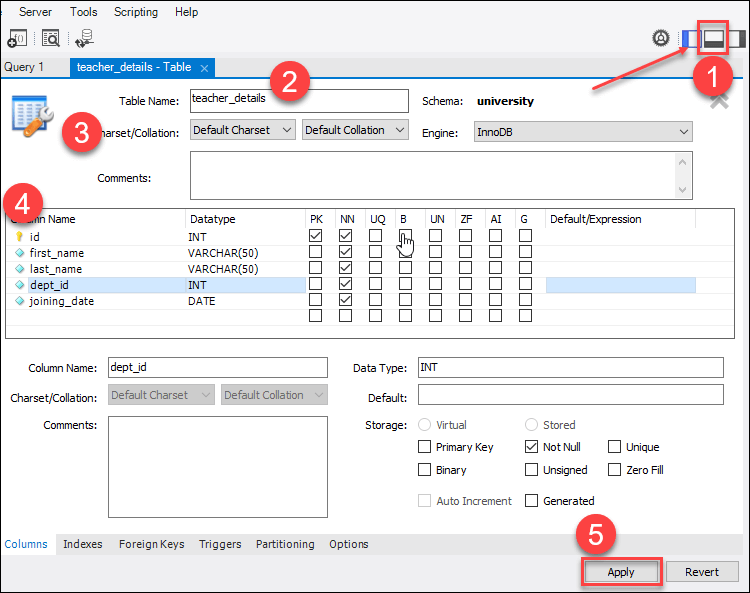
Fourth, a new window will appear. Here you need to fill up the details like table name. We will give the table name teacher_details and use default Charset/Collation and Engine.
Now, click on the middle window on the top right corner. As you can see below, the column name contains many attributes such as Primary Key(PK), Not Null (NN), Unique Index (UI), Binary(B), Unsigned Data type(UN), Auto Incremental (AI), etc. After filling in all the details, click on the Apply button.
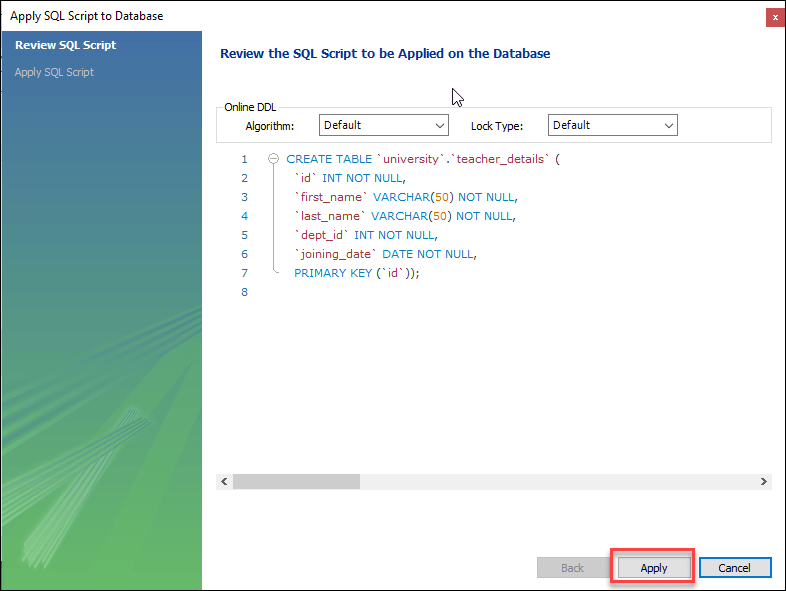
Fifth, the SQL statement window appears now. Again, click on the Apply button to execute the statement and the Finish button to save the changes.
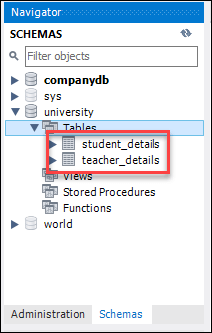
Sixth, to verify navigate to the Schema tab and double click on the database which contains the newly created table. The below will window appear. You can see that the new table teacher_details is inside the Tables sub-menu.
In this tutorial, you have learned how to a new table in MySQL using MySQL Command Line Client as well as MySQL Workbench.